
Hip pain can silently creep into your life. It may start as a dull ache after sitting too long, or a deep tightness that makes simple movements like bending, walking, or lying down uncomfortable. For many, this pain becomes a daily battle that steals comfort, sleep, and joy. Yet, within the ancient practice of yoga lies a natural, nurturing solution that reconnects body and mind — and helps release the physical and emotional weight trapped in your hips.
This is not just about stretching muscles. It’s about rediscovering movement, freedom, and peace through yoga for hip pain.
When we talk about hip pain, we are addressing more than a physical limitation. The hips are the body’s emotional storage center — a place where we unconsciously hold stress, sadness, and even unspoken fears. Practicing yoga for hip pain offers more than relief; it provides release. Each stretch, breath, and gentle pose opens the door to healing, flexibility, and renewal.
Let’s dive deep into understanding why yoga for hip pain works, how it transforms your body from stiffness to flow, and which poses can help you heal from the inside out.
Understanding Hip Pain — The Root Cause Behind the Ache
The hips are the bridge between your upper and lower body. They carry your weight, balance your posture, and control nearly every movement — from walking and running to standing still. When tightness or pain arises, it affects your entire structure, creating tension in the lower back, knees, and even shoulders.
Hip pain can stem from:
- Sitting too long: Modern lifestyles keep us glued to chairs, shortening hip flexors and weakening glutes.
- Lack of movement: Without regular stretching or exercise, the hip joint loses its natural range of motion.
- Injury or strain: Sports injuries or overexertion can cause inflammation and imbalance.
- Emotional tension: Believe it or not, emotions like anxiety or grief often settle in the hips, leading to tightness and discomfort.
Yoga for hip pain targets these issues holistically — it relaxes the muscles, restores blood flow, and teaches you to breathe through tension. Over time, this mindful movement builds strength and softness where your body needs it most.
The Healing Power of Yoga for Hip Pain
Yoga works differently than regular stretching or physiotherapy. It’s not about forcing flexibility; it’s about allowing your body to open naturally. Through deep breathing and awareness, yoga helps you move with intention, releasing stiffness gently and sustainably.
Practicing yoga for hip pain:
- Improves mobility: Gradually increases flexibility in the hip flexors, glutes, and lower back.
- Strengthens supporting muscles: Balances weak and tight muscles to prevent future discomfort.
- Enhances posture: Promotes proper alignment, reducing strain on the lower body.
- Releases emotional tension: Frees the stored energy that can manifest as tight hips.
- Boosts blood circulation: Encourages healing through improved oxygen and nutrient flow.
It’s not magic — it’s mindfulness. When you practice yoga regularly, your body begins to trust movement again. The stiffness softens, the pain fades, and a deep sense of peace returns.
The Connection Between Hips and Emotions
Ancient yogic philosophy and modern psychology both recognize that the body stores emotions. The hips, in particular, are seen as the body’s “emotional warehouse.” When we experience stress, heartbreak, or trauma, we subconsciously tense our muscles, often holding this energy in the hips and pelvis.
Have you ever noticed how it feels when you stretch your hips deeply — that strange mix of relief and vulnerability? That’s emotional release. The movement is not just physical; it’s an act of letting go.
Practicing yoga for hip pain becomes a spiritual journey — one that not only heals your joints but also helps you release emotional burdens you didn’t realize you were carrying. Each breath becomes a step closer to freedom.
Best Yoga Poses for Hip Pain Relief
Now, let’s explore the most effective yoga poses for hip pain relief. These poses are simple, restorative, and deeply therapeutic. Whether you’re a beginner or have practiced yoga for years, these asanas (postures) will help you open your hips safely and gently.
1. Butterfly Pose (Baddha Konasana)
How to do it:
Sit on the floor with your back straight. Bring the soles of your feet together and let your knees fall outward. Hold your feet with your hands and gently move your knees up and down like butterfly wings.
Why it helps:
This pose stretches the inner thighs, groin, and hip flexors while encouraging better blood circulation. It’s perfect for relieving stiffness from sitting too long.
Emotional note:
Butterfly Pose symbolizes openness. As your knees lower and hips expand, imagine releasing fear and welcoming freedom.
2. Pigeon Pose (Eka Pada Rajakapotasana)
How to do it:
From Downward Dog, bring your right knee forward and place it behind your right wrist. Stretch your left leg straight behind you. Keep your chest lifted or fold forward for a deeper stretch.
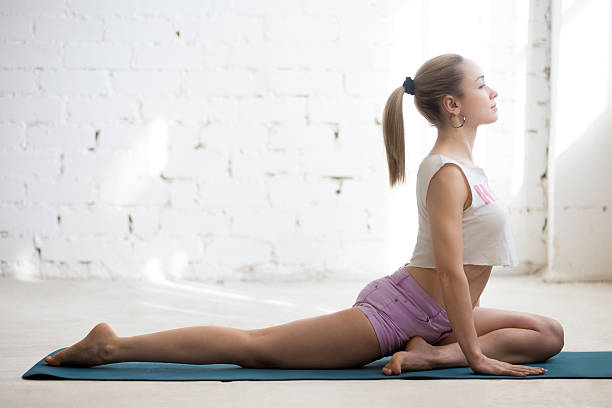
Why it helps:
Pigeon Pose deeply stretches the hip flexors and rotators. It’s one of the best postures for releasing tightness and improving flexibility in the pelvis.
Emotional note:
Many people feel emotional release during this pose — it’s an invitation to surrender, forgive, and let go.
3. Low Lunge (Anjaneyasana)
How to do it:
From a standing position, step one leg back and lower your knee to the floor. Keep your front knee bent at a right angle. Reach your arms upward or rest your hands on your thigh.
Why it helps:
Low Lunge stretches the hip flexors and strengthens the glutes. It’s excellent for counteracting the effects of prolonged sitting.
Emotional note:
This pose is about courage — leaning into vulnerability while staying strong.
4. Reclined Figure Four (Supta Kapotasana)
How to do it:
Lie on your back and cross your right ankle over your left thigh. Pull your left leg toward your chest, holding behind your thigh. Feel the stretch in your outer hip.
Why it helps:
It relieves tension in the glutes and piriformis muscles, which often contribute to hip pain.
Emotional note:
This gentle posture teaches patience — the art of finding comfort in discomfort.
5. Garland Pose (Malasana)
How to do it:
Stand with your feet wider than shoulder-width apart. Bend your knees and squat down, bringing your palms together at your chest. Keep your spine straight and press your elbows against your knees.
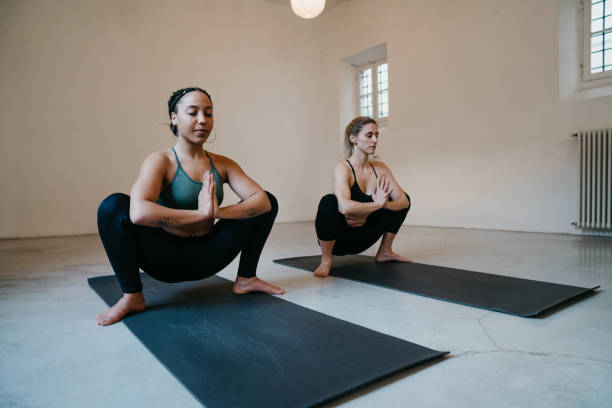
Why it helps:
This deep squat stretches the hips, lower back, and inner thighs while strengthening the legs. It improves mobility and stability.
Emotional note:
Malasana grounds you — reminding you that healing begins from your roots.
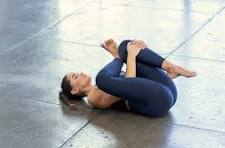
6. Happy Baby Pose (Ananda Balasana)
How to do it:
Lie on your back, bend your knees, and hold your feet with your hands. Pull your knees toward your armpits. Gently rock side to side.
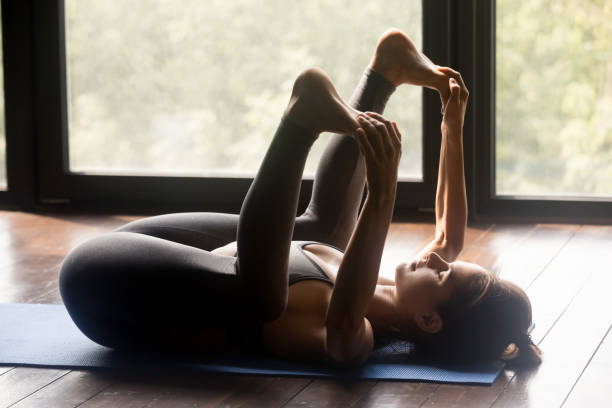
Why it helps:
This pose releases tension in the lower back and hips. It’s playful and soothing, perfect for relaxing both body and mind.
Emotional note:
Happy Baby reminds you to find joy in simplicity and embrace childlike ease.
7. Cow Face Pose (Gomukhasana)
How to do it:
Sit with one knee stacked directly over the other. Keep your feet pointing outward. Sit tall and breathe deeply into the hips.
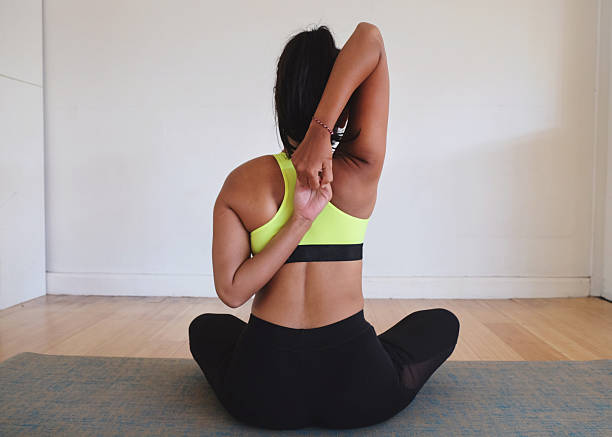
Why it helps:
It stretches the outer hips and glutes, areas often neglected but vital for joint health.
Emotional note:
This pose is about balance — between effort and surrender, strength and softness.
8. Frog Pose (Bhekasana)
How to do it:
Come onto your hands and knees. Widen your knees as far as comfortable, keeping your ankles in line with your knees. Gently lower your body forward, resting on your forearms.
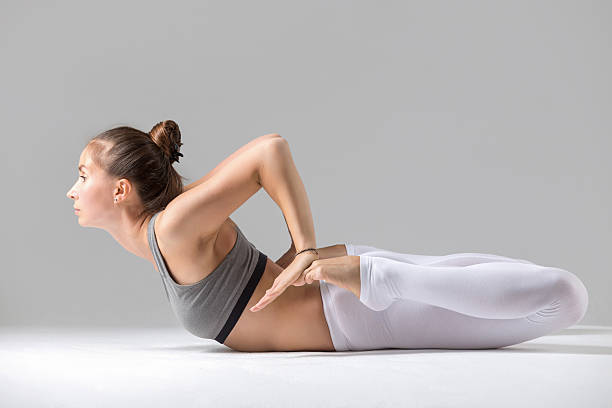
Why it helps:
This deep stretch opens the inner thighs and hips, releasing stubborn tightness.
Emotional note:
Frog Pose encourages vulnerability — an act of letting go of control and finding freedom in stillness.
9. Child’s Pose (Balasana)
How to do it:
Kneel on the floor, sit back on your heels, and fold your torso forward, extending your arms in front of you.
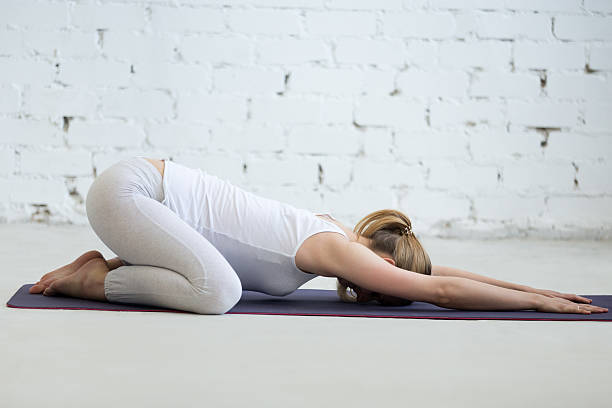
Why it helps:
Child’s Pose relaxes the hips, spine, and lower back. It’s a safe, restorative position that promotes emotional calm.
Emotional note:
It’s a pose of surrender — reminding you that rest is part of healing.
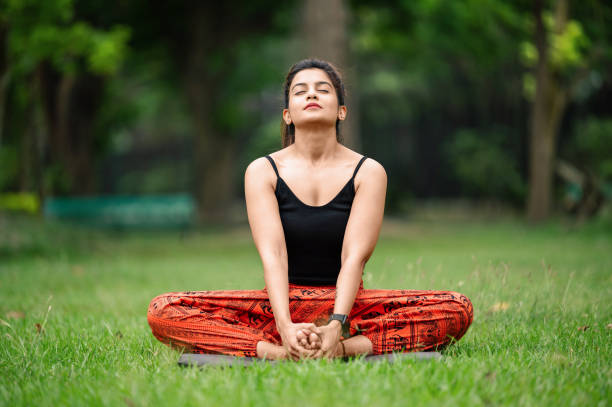
10. Reclined Bound Angle Pose (Supta Baddha Konasana)
How to do it:
Lie on your back, bring the soles of your feet together, and let your knees fall outward. Rest your arms comfortably by your sides.
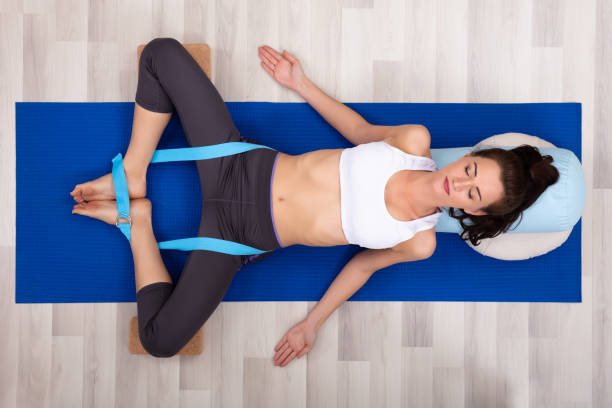
Why it helps:
This restorative posture opens the hips and chest while calming the mind.
Emotional note:
It embodies acceptance — of your body, your past, and your present moment.
The Role of Breath in Yoga for Hip Pain
In yoga, the breath is the bridge between the physical and emotional worlds. When practicing yoga for hip pain, deep breathing allows your body to soften into the poses, releasing tension from deep within the connective tissues.
Try this simple technique during practice:
- Inhale deeply through the nose for four counts.
- Exhale slowly through the mouth for six counts.
- Imagine sending your breath into your hips, melting away resistance with every exhale.
This conscious breathing not only enhances flexibility but also cultivates emotional release and inner stillness.
Lifestyle Tips to Support Yoga for Hip Pain
- Move regularly: Don’t stay seated for long periods. Stand, walk, and stretch throughout the day.
- Stay hydrated: Muscles and joints need water to stay supple.
- Sleep comfortably: Use a supportive mattress and avoid sleeping in twisted positions.
- Mind your posture: Keep your hips aligned when sitting or standing.
- Be patient: Healing takes time. Celebrate progress, no matter how small.
The Deeper Meaning of Hip Opening in Yoga
In yoga philosophy, the hips represent the body’s emotional and energetic gateway. The sacral chakra (Svadhisthana), located in the pelvic region, governs creativity, intimacy, and emotional expression. When blocked, it can manifest as both physical pain and emotional stagnation — feelings of being stuck, uninspired, or disconnected.
When you practice yoga for hip pain, you’re not only loosening tight muscles but also releasing stored emotional energy. This release can sometimes bring up tears, laughter, or a deep feeling of calm. And that’s completely normal — it’s your body healing itself, one breath at a time.
The journey is about more than flexibility; it’s about freedom — freedom to move, feel, and live with ease.
Advanced Yoga Poses for Hip Pain Relief
Once you’re comfortable with the foundational poses, you can gradually explore deeper asanas that open the hips further while strengthening the muscles that support them. These poses encourage balance between strength and flexibility — the key to preventing future pain.
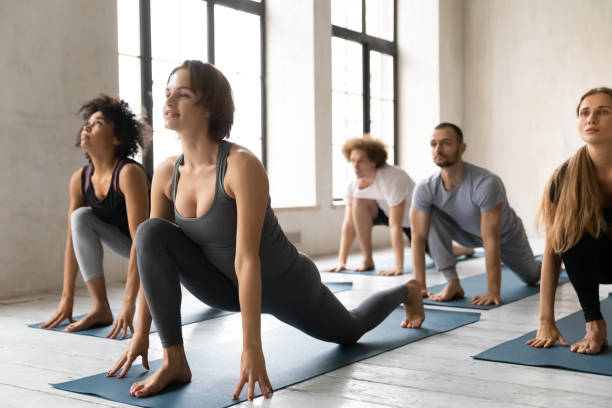
1. Lizard Pose (Utthan Pristhasana)
How to do it:
Start in a Low Lunge with your right foot forward. Place both hands inside your front foot and lower your elbows to the floor or onto blocks if needed. Keep your back leg extended and active.
Why it helps:
Lizard Pose stretches the hip flexors, groin, and hamstrings while strengthening the legs. It’s one of the most effective hip-opening poses for deeper flexibility and mobility.
Emotional reflection:
This pose challenges you to stay still in discomfort — teaching you how strength and softness can coexist.
2. Half Frog Pose (Ardha Bhekasana)
How to do it:
Lie on your stomach, bend your right knee, and reach back with your right hand to hold your ankle. Gently press your foot toward your glutes while keeping your chest lifted.
Why it helps:
It opens the hip flexors and quadriceps, releasing tension from prolonged sitting or overuse.
Emotional reflection:
Half Frog Pose is a reminder of balance — holding onto the past just enough to learn from it but not enough to let it weigh you down.
3. Wide-Legged Forward Fold (Prasarita Padottanasana)
How to do it:
Stand with your feet wide apart, toes slightly inward. With a straight spine, fold forward from your hips and place your hands on the floor or grab your ankles.
Why it helps:
This stretch lengthens the inner thighs, hips, and lower back while calming the nervous system.
Emotional reflection:
The inversion of this pose invites surrender — the courage to let go of control and trust your body’s wisdom.
4. Double Pigeon Pose (Agnistambhasana)
How to do it:
Sit with one shin stacked directly on top of the other, keeping your feet flexed. Sit tall or lean forward gently to deepen the stretch.
Why it helps:
This pose provides an intense outer hip stretch and relieves deep-seated tension in the glutes and piriformis.
Emotional reflection:
It represents alignment — not just of bones and muscles, but of mind and heart.
5. Fire Log Pose (Agnistambhasana Variation)
How to do it:
Sit on the floor, place one ankle on top of the opposite knee, and keep your shins parallel to the ground. Keep your spine tall and breathe deeply.
Why it helps:
Fire Log Pose targets deep hip rotators and encourages the hips to open symmetrically.
Emotional reflection:
It teaches you to sit in discomfort without judgment — a valuable life lesson.
6. Warrior II (Virabhadrasana II)
How to do it:
Stand with your feet wide apart. Turn one foot outward, bend the front knee, and extend your arms parallel to the ground. Keep your hips open and gaze over your front hand.
Why it helps:
Warrior II builds stability and endurance in the hips, thighs, and glutes.
Emotional reflection:
It awakens courage — the strength to face challenges and stay rooted even in chaos.
7. Extended Side Angle Pose (Utthita Parsvakonasana)
How to do it:
From Warrior II, rest your front forearm on your thigh or place your hand beside your foot. Extend your opposite arm overhead.
Why it helps:
It lengthens the entire side of the body while opening the hips and chest.
Emotional reflection:
This pose mirrors life’s balance — reaching forward while staying grounded.
The Emotional Release Through Yoga for Hip Pain
The hips are often the first place we tighten when we’re under stress. Practicing yoga for hip pain can stir unexpected emotions — frustration, sadness, even tears. But these emotions are part of healing.
When a pose feels challenging, pause, breathe, and notice the sensations. Every exhale helps you release not only muscular tension but also emotional weight. Allow whatever arises to flow through you — without resistance. This is the essence of yoga: healing from within, one breath at a time.
How to Create a Yoga Routine for Hip Pain Relief
Consistency is the secret ingredient in healing hip pain. You don’t need long sessions every day — just 20 to 30 minutes of mindful movement can make a world of difference. Here’s a simple structure to follow:
1. Warm-Up (5 minutes):
- Gentle hip circles
- Cat-Cow Pose to loosen the spine
- Seated Forward Fold
2. Main Sequence (20 minutes):
- Low Lunge
- Pigeon Pose
- Butterfly Pose
- Lizard Pose
- Happy Baby Pose
3. Cool Down (5 minutes):
- Reclined Bound Angle Pose
- Savasana (Corpse Pose)
End your practice by taking a few deep breaths in stillness. Feel the difference — the warmth in your hips, the lightness in your legs, and the peace in your heart.
The Mind-Body Connection in Hip Healing
Practicing yoga for hip pain isn’t just about stretching; it’s about awareness. As your hips begin to loosen, you might notice your mood lifting, your patience growing, and your sleep improving. This is because the body and mind are deeply intertwined.
When your hips are tight, energy flow in the body gets blocked, creating fatigue and irritability. When you open them through yoga, energy flows freely again, bringing a renewed sense of balance and calm.
This is why yoga is not just an exercise; it’s a therapy for both body and soul.
Supporting Your Practice Beyond the Mat
Healing hip pain takes more than just physical movement. It’s a lifestyle shift — a gentle reawakening of self-care.
Here are some simple daily habits that support your yoga journey:
- Walk more: Gentle walking keeps the hips active and prevents stiffness.
- Stretch after sitting: Take short breaks during work hours to move your legs and hips.
- Practice mindfulness: Notice how you sit, stand, and move. Small corrections in posture make a big difference.
- Rest well: A good night’s sleep allows your body to recover and heal.
- Eat anti-inflammatory foods: Incorporate turmeric, ginger, leafy greens, and omega-3s to support joint health.
Common Mistakes to Avoid in Yoga for Hip Pain
- Forcing deep stretches: Always listen to your body. Forcing a pose can lead to injury.
- Ignoring alignment: Keep your knees and toes pointed in the same direction to protect joints.
- Holding your breath: Breath is the foundation of yoga — it helps you release tension.
- Skipping rest: Rest is essential for your muscles to integrate the benefits of practice.
Remember, yoga is not about perfection — it’s about progress and awareness.
The Journey from Pain to Peace
Healing hip pain through yoga is a gradual journey. Some days, your hips will feel tight; other days, you’ll flow with ease. But every time you step onto the mat, you’re showing up for your own healing.
Your hips will thank you not just for the relief, but for the love and attention you give them. Over time, you’ll notice that movements become lighter, your posture more graceful, and your energy more vibrant.
And most beautifully, you’ll notice that the same patience and strength you cultivate in your hips start to reflect in your life — in the way you handle stress, relationships, and challenges.
Conclusion: Finding Freedom Through Yoga for Hip Pain
Yoga for hip pain is a journey of transformation — from stiffness to flexibility, from pain to peace, and from holding on to letting go. It teaches you to listen, to breathe, and to move with love.
Each pose, each breath, is a message from your body asking for care and attention. And as you respond with patience, your body responds with healing.
So take a deep breath. Roll out your mat. Start where you are — with compassion and curiosity. Whether your hips are tight or tender, remember that healing doesn’t happen in one session; it unfolds through time, devotion, and the gentle power of your breath.
Для получения информации о [url=https://ritual-tutaev1.ru/]пособие на погребение в 2022 году в беларуси[/url], следует обратиться к официальным источникам или соответствующим государственным службам.
В Минске предусмотрена финансовая помощь на погребение, которая помогает семьям в трудное время .
Основная цель пособия — снизить финансовое бремя близким умершего.
Для оформления пособия необходимо обратиться в соответствующие службы с пакетом документов .
Чтобы оформить пособие, нужно собрать все необходимые документы заранее .
Финансирование помогает семьям покрыть основные расходы, связанные с похоронами .
Обычно заявления рассматриваются в течение определенного срока, после чего семье сообщают решение .
Пособие на погребение — один из важнейших видов помощи в трудные жизненные моменты .
Правильное оформление документов значительно ускоряет получение выплаты .
https://www.google.bi/url?q=http://ritual-tutaev1.ru
http://www.google.lu/url?q=http://ritual-tutaev1.ru
https://www.google.ro/url?q=http://ritual-tutaev1.ru
http://www.google.fi/url?q=http://ritual-tutaev1.ru
http://marcellospizzapasta.com/?URL=ritual-tutaev1.ru
При организации поминок в Минске важна тщательная подготовка, поэтому стоит обратиться к профессионалам по [url=https://ritual-blk.ru/]организации поминок[/url].
Организация поминок в Минске — это сложное и деликатное дело. Эта статья предлагает обзор важных факторов, связанных с организацией поминок.
Важным этапом является определение места, где будут проходить поминки. Выбор подходящего заведения в Минске может оказаться ключевым моментом в организации поминок. Также стоит учитывать такие факторы, как количество гостей и транспортная доступность.
После выбора места следует составить список гостей. Составленный список позволит учесть всех, кто должен присутствовать на мероприятии. Заранее уведомленные гости смогут подготовиться к мероприятию и уделить время встрече.
Медийная поддержка — еще один важный аспект организации поминок. Не забудьте о том, что хорошая фотография поможет сохранить момент навсегда. Уделите внимание деталям, которые помогут создать легкую атмосферу среди гостей.
https://cse.google.al/url?q=https://ritual-blk.ru
http://cherrybb.jp/test/link.cgi/ritual-blk.ru
http://www.google.ne/url?q=http://ritual-blk.ru
https://cse.google.so/url?q=http://ritual-blk.ru
http://www.google.ms/url?q=http://ritual-blk.ru
На кладбище установили [url=https://vpamyat55.ru/]памятники из гранита на могилу[/url].
Надгробный памятник является важным элементом памяти о покойном . Он является символом любви и скорби. Процесс изготовления памятника включает несколько этапов.
Перед началом работ необходимо выбрать вид надгробия. Или индивидуально выполненная скульптура. Важно учесть особенности захоронения и предпочтения семьи .
Далее важно выбрать материалы, из которых будет создан памятник. В качестве основы выбирают бетон или камень. Материал должен быть прочным и устойчивым к погодным условиям . Цвет и оттенок материала также значимы .
Процесс изготовления памятника включает много этапов . Затем осуществляется обработка выбранного материала . Важны качество резьбы и отделки .
Финальный этап — установка памятника на могилу государственного или частного характера. Этот процесс требует аккуратности и профессионализма . Иногда требуется дополнительная обработка и уход.
https://www.google.cz/url?q=http://vpamyat55.ru
http://google.ad/url?q=http://vpamyat55.ru
https://www.google.hn/url?q=http://vpamyat55.ru
https://ssylki.info/?who=vpamyat55.ru
https://voensud.ru/go/?http://vpamyat55.ru