
Pain has a way of reminding us that we’re alive — sometimes in the harshest ways. For those who’ve felt the deep, shooting ache of sciatica, the kind that runs like electricity from the lower back down through the legs, even simple daily movements can become painful. But there’s hope, and it lies not in pills or quick fixes, but in the mindful, healing power of movement itself. Yoga — ancient, steady, and compassionate — offers a way to ease the suffering.
Practicing yoga poses for sciatica pain is not only about relieving discomfort; it’s about learning to listen to your body, slow down, and heal from the inside out. Yoga gently stretches tight muscles, strengthens weak areas, and restores balance to the spine and nerves — creating relief that feels natural, empowering, and lasting.
In this post, we’ll explore how yoga can become your most reliable friend in the journey toward a pain-free life. We’ll uncover why sciatica happens, how specific yoga poses can relieve it, and how to create a safe daily routine that soothes your back and mind.
Table of Content
- 1. Understanding Sciatica: The Root of the Pain
- 2. How Yoga Helps Relieve Sciatica Pain
- 3. Preparation: Before You Begin Yoga for Sciatica
- 4. The 10 Best Yoga Poses for Sciatica Pain
- 1. Downward-Facing Dog (Adho Mukha Svanasana)
- 2. Pigeon Pose (Eka Pada Rajakapotasana)
- 3. Reclined Figure Four Stretch
- 4. Cat-Cow Pose (Marjaryasana-Bitilasana)
- 5. Child’s Pose (Balasana)
- 6. Supine Spinal Twist (Supta Matsyendrasana)
- 7. Bridge Pose (Setu Bandhasana)
- 8. Legs-Up-The-Wall Pose (Viparita Karani)
- 9. Cobra Pose (Bhujangasana)
- 10. Seated Forward Bend (Paschimottanasana)
- 5. Building a Gentle Routine
- 6. The Mind-Body Connection in Yoga for Sciatica Pain
- 7. Creating a Healing Space for Yoga Practice
- 8. Yoga Breathing for Sciatica Relief
- 9. Emotional Healing Through Yoga
- 10. Lifestyle Tips to Support Yoga Healing
- 11. Common Mistakes to Avoid
- 12. Sample 15-Minute Daily Yoga Routine for Sciatica Pain
- 13. How Long Until You Feel Relief
- 14. When to Seek Medical Advice
- 15. Final Thoughts: Trust Your Body’s Power to Heal
1. Understanding Sciatica: The Root of the Pain
Before we dive into yoga, it’s essential to understand what sciatica truly is. The sciatic nerve is the largest nerve in the human body, running from your lower spine through your hips, buttocks, and down each leg. When this nerve becomes compressed or irritated, it causes the signature symptoms: sharp lower back pain, tingling, numbness, or shooting sensations down one leg.
The most common causes include:
- Herniated or slipped discs
- Tight piriformis muscle (a deep gluteal muscle)
- Poor posture and prolonged sitting
- Weak core and lower back muscles
- Spinal misalignment or injury
Unlike temporary muscle aches, sciatica often lingers because it’s linked to nerve compression. That’s why simply taking rest or painkillers doesn’t provide lasting relief. You need to release pressure on the nerve and restore spinal balance — and that’s where yoga comes in beautifully.
2. How Yoga Helps Relieve Sciatica Pain
Yoga works holistically — combining breath, awareness, and posture to treat both the physical and emotional causes of pain. When practiced mindfully, yoga poses for sciatica pain can:
- Stretch tight muscles around the hips and lower back, especially the piriformis and hamstrings.
- Strengthen the core, glutes, and back muscles to support proper spinal alignment.
- Improve posture, reducing long-term nerve compression.
- Enhance blood circulation, promoting healing in inflamed areas.
- Calm the nervous system, reducing stress and tension that often worsen pain.
Yoga reminds us that healing doesn’t have to be aggressive — it can be slow, gentle, and nurturing. Each breath invites release; each stretch reminds the body that it’s safe to let go.
3. Preparation: Before You Begin Yoga for Sciatica
If you’re dealing with severe or chronic pain, always consult your doctor before starting a new exercise. Once cleared, follow these guidelines before practicing:
- Warm up your body with light movements like walking or gentle leg stretches.
- Avoid pushing through pain — yoga should relieve, not aggravate, discomfort.
- Keep your movements slow and focused.
- Practice on a soft surface or yoga mat.
- Listen to your breath — if you’re holding it, you’re probably straining.
The aim is not perfection but presence. Healing comes from consistency and care, not from how deep your stretch goes.
4. The 10 Best Yoga Poses for Sciatica Pain
Now, let’s explore the most effective yoga poses for sciatica pain — each one carefully designed to release tension, strengthen your back, and improve flexibility.
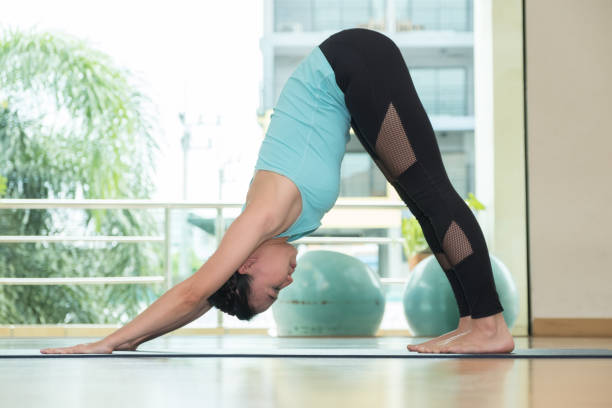
1. Downward-Facing Dog (Adho Mukha Svanasana)
This classic yoga pose lengthens the spine and stretches the hamstrings, both crucial for relieving sciatica.
How to Do It:
Start on your hands and knees. Press your palms into the mat, lift your hips upward, and straighten your legs. Keep your head between your arms, creating an inverted “V” shape.
Benefits:
- Decompresses the spine
- Relieves pressure on the lower back
- Strengthens shoulders and legs
Tip: Bend your knees slightly if your hamstrings feel tight.
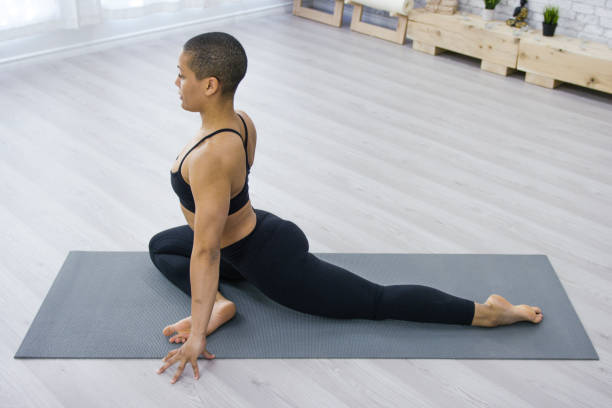
2. Pigeon Pose (Eka Pada Rajakapotasana)
This deep hip opener targets the piriformis muscle, a common source of sciatic pain.
How to Do It:
From Downward Dog, bring your right knee forward and place it behind your wrist. Extend your left leg back. Keep your spine tall and breathe deeply.
Benefits:
- Releases the glutes and piriformis
- Stretches hip flexors
- Improves lower back mobility
Tip: Place a cushion under your hip if you feel strain.
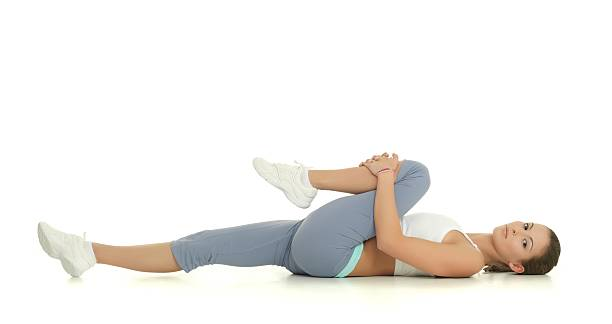
3. Reclined Figure Four Stretch
This pose is one of the simplest yet most effective stretches for sciatica.
How to Do It:
Lie on your back, bend your knees, and cross your right ankle over your left thigh. Pull your left leg toward your chest, keeping both feet flexed.
Benefits:
- Targets deep gluteal muscles
- Relieves nerve pressure
- Can be done anytime, even in bed
Tip: Keep your head and shoulders relaxed on the floor.
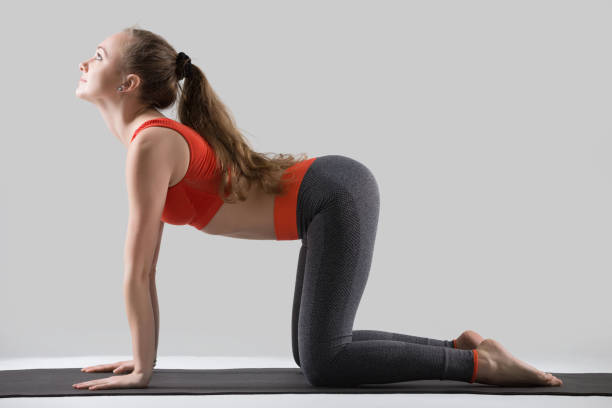
4. Cat-Cow Pose (Marjaryasana-Bitilasana)
This gentle flow increases flexibility in the spine and relieves tension in the back muscles.
How to Do It:
On hands and knees, inhale to arch your back (Cow Pose) and exhale to round it (Cat Pose). Move with your breath.
Benefits:
- Improves spinal mobility
- Strengthens core muscles
- Releases stiffness from sitting
Tip: Move slowly and match each motion to your breath.
5. Child’s Pose (Balasana)
A deeply relaxing stretch for the lower back and hips.
How to Do It:
Kneel on the floor, touch your big toes together, and sit back on your heels. Extend your arms forward and rest your forehead on the mat.
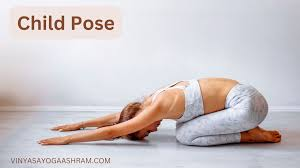
Benefits:
- Stretches spine and hips
- Relieves lower back tension
- Calms the mind
Tip: If your hips feel tight, place a pillow between your thighs and calves.
6. Supine Spinal Twist (Supta Matsyendrasana)
This pose gently realigns the spine and eases pressure on the sciatic nerve.
How to Do It:
Lie on your back, bend your right knee, and drop it across your body. Stretch your right arm to the side and look toward it.
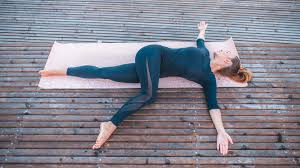
Benefits:
- Increases spinal flexibility
- Improves circulation
- Reduces nerve compression
Tip: Keep both shoulders grounded on the mat.
7. Bridge Pose (Setu Bandhasana)
Strengthening your glutes and lower back helps stabilize the spine, a key to long-term relief.
How to Do It:
Lie on your back with knees bent and feet hip-width apart. Press your feet down as you lift your hips toward the ceiling.
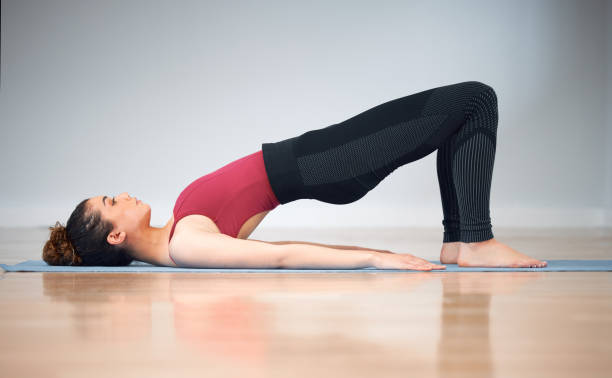
Benefits:
- Strengthens the posterior chain
- Reduces strain on lower back
- Improves circulation
Tip: Engage your core to support the lift.
8. Legs-Up-The-Wall Pose (Viparita Karani)
One of the most restorative yoga poses for sciatica pain, this helps relax the lower body and improve blood flow.
How to Do It:
Sit sideways near a wall, then lie back and extend your legs up the wall. Let your arms rest beside you and close your eyes.

Benefits:
- Relieves tension in lower back
- Reduces swelling in legs
- Calms the nervous system
Tip: Stay for 5–10 minutes to fully relax the body.
9. Cobra Pose (Bhujangasana)
A mild backbend that strengthens the spine and opens the chest.
How to Do It:
Lie on your stomach, place your palms under your shoulders, and lift your chest as you inhale. Keep your elbows slightly bent.
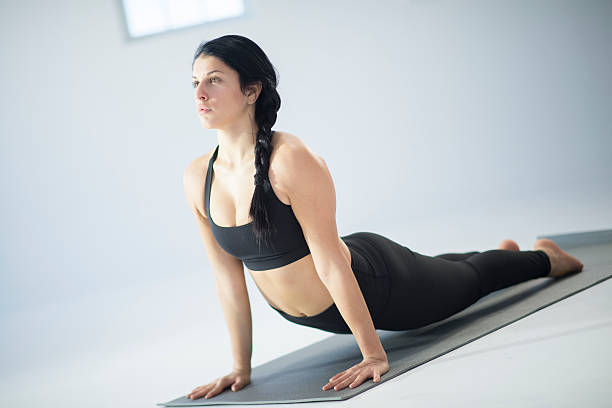
Benefits:
- Strengthens back muscles
- Enhances flexibility
- Encourages better posture
Tip: Avoid compressing the lower back; engage your core.
10. Seated Forward Bend (Paschimottanasana)
A gentle stretch for the hamstrings and spine, helping to release tension along the sciatic nerve path.
How to Do It:
Sit with your legs extended, inhale to lengthen your spine, and exhale to fold forward slowly.
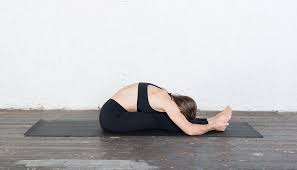
Benefits:
- Stretches the back and legs
- Improves flexibility
- Calms the nervous system
Tip: Don’t force the stretch — focus on breathing deeply.
5. Building a Gentle Routine
To make the most of your yoga practice, consistency is key. Start with just 10–15 minutes a day and build up to 30 minutes as your body adjusts. Alternate between stretching and strengthening poses to maintain balance.
In Part 2, we’ll cover:
- A complete 20-minute sciatica relief routine
- Breathing and relaxation techniques
- Common mistakes to avoid
- Lifestyle habits to support healing
- A 7-day step-by-step yoga plan for long-term comfort
6. The Mind-Body Connection in Yoga for Sciatica Pain
One of the most beautiful things about yoga is that it doesn’t only heal the body—it heals the mind. When you practice yoga poses for sciatica pain, you are not just stretching your muscles; you’re also calming your nervous system, which often plays a big role in how you experience pain.
When we’re stressed, the body produces more cortisol and adrenaline—hormones that tighten muscles and increase tension in the lower back. This can make sciatic pain worse. But during yoga, your breathing slows down, your heart rate stabilizes, and your muscles begin to relax. Your body moves from a state of tension to one of healing.
That’s why even a simple 15-minute daily yoga routine can make a huge difference—not just physically, but mentally and emotionally too.
7. Creating a Healing Space for Yoga Practice
Before you begin, create a peaceful environment where your mind can rest and your body can focus on healing. Here’s how:
- Find a quiet spot: Choose a corner of your home that feels calm and private.
- Use a yoga mat or soft rug: A stable, non-slip surface supports your balance and safety.
- Light a candle or play soft music: A touch of serenity can deepen your relaxation.
- Be consistent: Healing takes time—so show up daily, even if it’s just for 10 minutes.
Consistency is the key to long-term relief. It’s not about how deep your stretches go, but how regularly you nurture your body and mind.
8. Yoga Breathing for Sciatica Relief
Breath is the soul of yoga. If your breathing is shallow, your body remains tense. Deep breathing—called Pranayama in yoga—helps your muscles loosen, improves blood flow, and releases pain naturally.
Try this gentle breathing technique before or after your yoga poses for sciatica pain:
- Sit comfortably with your spine straight.
- Inhale deeply through your nose for four counts.
- Hold the breath for two counts.
- Exhale slowly through your mouth for six counts.
- Repeat this for 5–7 minutes daily.
This mindful breathing reduces nerve irritation, calms your mind, and creates space for healing.
9. Emotional Healing Through Yoga
Sciatica doesn’t just affect your back—it can impact your emotions. Chronic pain can bring frustration, sadness, and even fear of movement. But yoga gently teaches you to trust your body again.
As you hold each pose, you learn to listen—to understand what your body is trying to say. Maybe it’s asking for rest, or maybe it’s reminding you of your strength. Every deep breath, every stretch, becomes a step toward emotional freedom.
Remember, you are not your pain. You are the energy that moves beyond it.
10. Lifestyle Tips to Support Yoga Healing
Healing sciatica through yoga is most effective when supported by simple daily habits. Here are some powerful lifestyle changes to boost your progress:
| Healthy Habit | How It Helps Sciatica |
|---|---|
| Stay hydrated | Keeps spinal discs flexible and nourished |
| Walk daily | Improves circulation and reduces stiffness |
| Maintain good posture | Reduces pressure on the sciatic nerve |
| Sleep on a firm mattress | Keeps spine aligned during rest |
| Eat anti-inflammatory foods | Reduces nerve irritation and inflammation |
Combine these with your daily yoga poses for sciatica pain, and you’ll notice lasting changes—both in your comfort and your overall energy.
11. Common Mistakes to Avoid
Even though yoga is healing, certain mistakes can slow your recovery or worsen the pain. Avoid these common pitfalls:
- Overstretching: Don’t force your body into deep poses. Gentle progress brings better results.
- Skipping warm-up: Always prepare your muscles with light movements before intense stretches.
- Inconsistent practice: Missing days breaks your healing rhythm. Practice regularly, even briefly.
- Ignoring alignment: Wrong posture can pressure your lower back. Follow guided form.
- Holding your breath: Breathing deeply is what connects your mind and body during healing.
Remember, yoga is not a race—it’s a lifelong friendship with your body.
12. Sample 15-Minute Daily Yoga Routine for Sciatica Pain
You don’t need to spend hours practicing yoga. A short, mindful session can bring visible relief.
Morning Routine (15 Minutes):
| Time | Pose | Duration |
|---|---|---|
| 2 min | Cat-Cow Stretch | Warm up spine and ease stiffness |
| 3 min | Downward-Facing Dog | Strengthens hamstrings and glutes |
| 3 min | Pigeon Pose | Opens hip joints and stretches piriformis |
| 2 min | Supine Twist | Relieves pressure in the lower back |
| 3 min | Child’s Pose | Calms nerves and releases tension |
| 2 min | Corpse Pose | Deep relaxation and mental peace |
Practicing this short series daily can bring both physical comfort and emotional calm.
13. How Long Until You Feel Relief
Everyone’s body is different. Some feel relief after the first session, while others need several weeks. Generally, with regular yoga poses for sciatica pain, most people notice improvement within 2–4 weeks.
The key is patience. Healing is not just about fixing what’s wrong—it’s about reconnecting with what’s right inside you.
14. When to Seek Medical Advice
Although yoga is safe and natural, you should consult a doctor or physiotherapist if:
- The pain is severe or shooting down the leg
- You experience numbness or weakness
- Yoga doesn’t improve your condition after several weeks
Sometimes, yoga works best when combined with medical treatment or physical therapy. The goal is not to avoid help but to find balance between science and self-care.
15. Final Thoughts: Trust Your Body’s Power to Heal
If there’s one thing to remember about yoga poses for sciatica pain, it’s this: your body wants to heal—it just needs your patience and love. Yoga is more than movement; it’s a conversation between your body and your soul.
When you step on your mat, you’re not escaping your pain—you’re transforming it. You’re telling your body, “I’m listening. I care.” That simple act of kindness begins a beautiful journey of recovery.
So, breathe deeply. Move gently. Trust fully.
Your healing has already begun.